Showing posts with label Crafts. Show all posts

Tuesday, November 15, 2011

{Needle Felted Snowman}

Made this little needle felted snowman for this years Christmas crafts.


Thanx for having a looksee =)

Wednesday, November 9, 2011

{ Wallhanger Tutorial }


I've seen this wall decor online somewhere and wanted to make one for myself.
Here is my own version of it along with a quick tutorial.


I bought a lot of these wooden plaques at Hobby Lobby one time. 
I'm pretty sure there was a reason. Some project I had in mind? I really don't remember, so when I saw that wall hanger, I found my reason to at least make use of three.


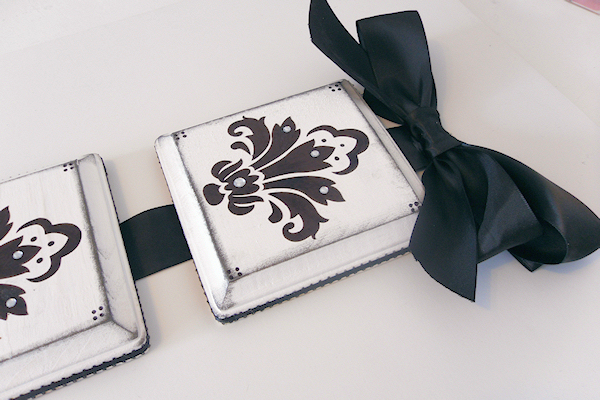
I've painted them white.


Then I used my black stamp pad and aged the edges and corner a bit.


Instead of making my own svg file I downloaded the damask design SVG File from BeaOriginal and used my die cutting machine to cut it out of vinyl.

  (Noticed the little dot missing?...Yep, I found it ) :0}


I embellished the plaques with some ribbon....


added some little black dots to the corners...


and Rhine stones. 
You could of course use any other decorative bits you might like instead.


 Adhered the plaques to a nice piece of ribbon and a bow for hanging voila it was finished!


Thanx for having a looksee =)

Saturday, November 5, 2011

{ Mini Scrapbook Album }

I really like anything miniature. 
Some of my favorites are mini scrapbook albums. They are cute, fun to decorate and you can use a lot of your smaller paper scraps for these!

Carry them with you and show to friends or family and brag about the newest grandchild or the best vacation ever! They also look great in a bowl placed on your coffee table so visitors can take a look at them. Make them as individual little gifts of captured moments with friends and family members.

In this tutorial I will show you how to make one of these little albums. I've seen these somewhere and have made many of them since.


You will need 4 pieces of card stock  each measuring 2 3/4" x 11"

On 3 of these strips you will make your scores at 3", 6" and 9".
(The 4th strip will become the album cover.)

After you scored your 3 strips you will fold your score lines alternately and then glue them together to make one strip.

First take a strip with a small section at the end and glue it to the back of the beginning section of your 2nd strip.......


Repeat with the last strip and the inner section of your album is already done!


Now we make the albums cover:

Score the 4th paper strip at 3", 3 1/2", 6 1/2", 7" and 9".


Fold the section at the 9" score over and glue it down.
This will be the closing flap and give your cover a little more strength.


Fold the paper at the other score marks as well.


Now line your cover and paper strip up and glue the beginning section of your cover to the back of the beginning section of your paper strip.


This is how it would look like glued together.


Now fold your paper strip alternately and close the cover around it.  Your basic mini album is complete!


Embellish your album sections and the cover as you wish.


Thanx for having a looksee =)

Tuesday, November 1, 2011

{ Folded Flowers Wall Art }


 I've had this old perfectly square frame laying in my craft room. The thing was constantly in my way and finally I had enough!

It was time to place something in the frame and find it a home within my home so it would not be in the way anymore and serve a purpose. 
We just remodeled the last 2 of our guest rooms and they had absolutely nothing in them yet.
I figured this frame would be a nice beginning. The only thing I needed was some picture or something else artsy to place inside of it.

I decided on doing a paper crafty insert for said frame. 

It was painted a chocolate brown, and I started to fold 9 of these lovely flowers. They were adhered to this nice vintage sheet music paper and embellished in the center with a glass pebble. Tadaaa.....

If you would like to {learn how to fold these flowers} check out my tutorial and use them in your own projects.


Thanx for having a looksee =)

Sunday, May 29, 2011

{ Laundry Description Decor }

I have been working on some decor items for my new laundry room.
This is my version of a {Laundry Dictionary Description Sign}

The description is directly printed on burlap and then placed in an old frame I painted black and then covered the backing with cotton canvas fabric.

I used 4 upholstery nails to pin the burlap to the backing. The nails had to be shortened of course, or they would punch through the back! The frame has been left without the glass. Somehow I like it better without it.


Thanx for having a looksee =)

Monday, May 23, 2011

{ Butterfly Specimen Displays }

I made some cute butterfly specimen displays, without harming any of those lovely creatures.
A long time ago I bought several cheap, small and unfinished shadowbox frames. For sometime now I had been thinking about what to do with them. Then the idea of a butterfly specimen display came about. They seem to be rather popular in home decor these days. Besides, who doesn't like a pretty butterfly?

Since I like butterflies to be alive instead of speared onto a pin I searched the internet
for butterfly photos I liked. Then printed and cut them out. 
The back and sides of the inside of the frame were covered in cotton fabric.....a.k.a. 

{A painters drop cloth}.

The frame has been painted a crisp white and finally the butterflies have been glued to the frames backing.

Hardly took any time at all to do!


Thanx for having a looksee =)

Monday, March 21, 2011

I've never really been into much paper crafting, but lately I begin to enjoy it more and more. Here is a banner I made for the fireplace to welcome spring. I made an SVG file to cut the banner on my Cricut and then embellished.

I'm pleased about how it looks and I think I will make some more for other occasions.


Thanx for having a looksee =)
Friday, March 11, 2011

{ Chicken Wall Art }

I've been practicing in making my own SVG cutting files for my Cricut and the SCAL or MTC programs to cut them with. Today I made this cute wall art project for my kitchen.


Download the svg file if you would like this File to 

{ MAKE YOUR OWN CHICKEN ART }


Thanx for having a looksee =)

Wednesday, December 15, 2010

{ Vintage Chenille Ornies }

These cute ornaments are made from chenille stems and Victorian angel images.


Thanx for having a looksee =)