Sunday, December 26, 2010

{ Nightstand Makeover }

This house came with a set of dressers and a nightstand. The previous owners left them behind. Most likely because there was some damage to them around the bases. The laminate is coming lose and the pressed wood underneath is starting to grumble away. Besides, their overall look isn't all that appealing to me.

I thought maybe a makeover would help them to become a nice piece of furniture that I would be willing to use. I know that laminate furniture can be difficult to repair and paint, but I give it a try by beginning with the nightstand.

Here is the before

After

First I removed the hardware and gave the nightstand a good sanding. I used wood putty to fill in the screw holes and filled in where the pressed wood had grumbled away. Then sanded those spots smooth so it would blend in again.

After that I applied a layer of primer and then painted the entire piece with Kitchen & Bath Enamel. I wanted it to have a nice strong layer of paint and to be washable. Nice simple hardware finishes this nightstand.

I think it turned out great!

Thanx for having a looksee =)

Wednesday, December 15, 2010

{ My X-Mas Cactus Is Blooming }

Check it out.
My little {Christmas Cactus} is blooming.....I love it.


Thanx for having a looksee =)

{ Vintage Chenille Ornies }

These cute ornaments are made from chenille stems and Victorian angel images.


Thanx for having a looksee =)

Tuesday, December 14, 2010

{ ATC Keeper }

I made this ATC { Artist Trading Card Holder } for a friend of mine. 
She collects these little works of art and I thought she might like one of these holders.

Very simple to make and lots of fun to decorate.


Thanx for having a looksee =)

Saturday, November 20, 2010

{ Cricut Cutting Mat Recycle }

I love my Cricut, but everything about this great machine comes with a hefty price. I'd love to buy all the neat cartridges and the accessories, but we're only a one income household with lots of medical bills and house repairs, it is a very rare treat to buy something new to work with my Cricut.

So I resort to using my cutting mats as much as possible without having to constantly buy new ones.

{ HERE IS WHAT I DO }

You will need:


  • :: Krylon Easy-Tack ::
  • :: GOO GONE ::
  • :: Masking Tape ::
  • :: Old Plastic Pan Scraper Or Credit Card ::
  • :: Your Not So Sticky Anymore Cutting Mat ::

First gather everything listed above and then cover your work surface


Sprinkle some of your adhesive remover onto the cutting mat.
I use GOO GONE.


With a paper towel evenly spread the GOO GONE all over the cutting mat.
Let it sit for several minutes to do it's magic.


Now use an old plastic pan scraper or credit card and start scraping the old 
{ Not so sticky anymore } sticky stuff from your mat. 
Check and make sure all of it has been removed. 
Your mat should now be smooth. If not repeat the process till you got it all off.

Your mat will have a greasy film on it that you need to wash off!
I just rinse mine in the kitchen sink with warm water and some soap.
Dry!


With your masking tape, cover the borders around the mat, making sure only the actual cutting surface stays exposed.


Now spray a very light and even coat of Easy-Tack on the mat.
DO NOT spray too much or your paper or card stock will not come of the mat without tearing!

Let dry for at least 3 hours for the mat to be tacky again.
I leave mine to dry over night.


If you won't use your mat right away and don't have the cover for your mat anymore to protect it from dust and such you can cut a piece of wax paper and cover your mat with it instead.

NOW YOUR MAT CAN BE USED MANY TIMES MORE =)

Thanx for having a looksee =)

Thursday, November 18, 2010

{ Country Like Dining Room Sign }

I like hand painted country signs and have been wanting to make one for my dining room for some time now.
Unfortunately I don't have a very steady hand to paint nice letters and I was not able to find a stencil for the saying I wanted on my sign.

Thanks to my Cricut I was able to come up with a nice version of a country sign and it turned out looking great!


First I painted a blank of wood with acrylic paint. I used the colors Country Tan and then black for the borders. While the paint was drying I cut out the letters for my saying with my Cricut. I just used a textured black card stock instead of vinyl and Mod Podged the words onto the wood. After I was all done I gave the entire sign one more coat of Mod Podge to seal it all.


Thanx for having a looksee =)

Wednesday, November 17, 2010

{ Nice Sunset Sky }

New Mexico displays some of the nicest sunsets.


{ Monogram Plate In A Frame }

I had this old collector plate in a frame. It looked like something you find in a Goodwill or garage sale.
Again I have no idea where I got it or when, but I think the reason i picked it up was the frame holding the plate.

I sponge painted the plate with white acrylic paint. The frame was spray painted black.
With my Cricut I cut out a nice B monogram letter and a fancy scroll and Mod Podged them onto the plate.

After everything was dry I put the plate back into the frame and now I have a nice wall decor piece.


This was a quick and easy little project and I had so much fun doing it that I will try and make one of these neat country signs for my dining room with a similar method I used here. 

Thanx for having a looksee =)

Wednesday, October 20, 2010

{ Sad Little Wood And Canvas Chair }

I've had this chair for a long time and cannot remember how and when we got it. I will try and bring it back to live within the next week or so. I think with a little paint and new fabric this little guy will look nice again.

{ Doesn't it look sad? }


So here it is with it's back support missing, the wood is splattered with paint and is faded from exposure to sun.


Here I was taking it apart to get is ready for sanding


The old seat canvas has been washed so it can be covered with new fabric. I wanted to reuse it, because it is very sturdy. The new cover will be cotton canvas which is really a paint drop cloth I bought at the hardware store.


The wooden chair parts have been sanded, primed and painted white. After the paint had dried the seat canvas was replaced and secured with the hardware.


The only thing left to do was sew a new back support. For a little bit of girly flair I added a nice crochet border.


Here is the chair all finished. Still need to iron the back support a little tho!

 I can't help, but be proud of it. =)

Thanx for having a looksee =)

{ Guest Bathroom }

Finally we're starting on re-doing the guest bathroom!
I absolutely hate it and can't wait to cutesy it all up. It is very small, dark and has no personality.
We don't use it much, because it is just not a nice room to be in.


Popcorn Ceiling.....Honestly!?


Seams on the walls are just covered with thin strips of wood, 
cheap and cheesy mirror!
{ That's gotta go! }


Sad...sad....sad! { SIGH }


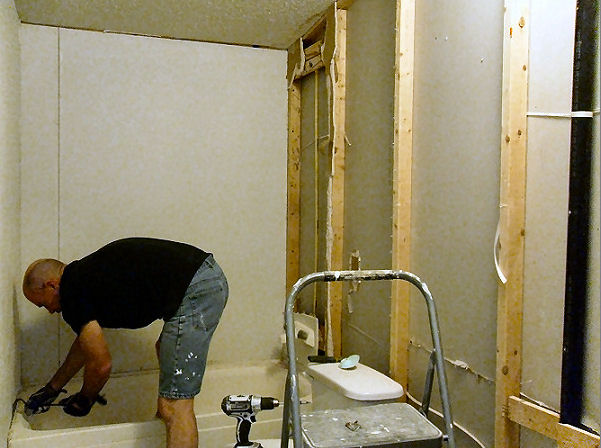
The old Vanity of which I forgot to take a pic has been ripped out.
My husband is taking out the bathtub after he already tore away one wall of sheet rock.

Not shabby for one afternoon worth of work! =)

{NEXT}

The bathtub has been removed and after some measuring my husband realized that a new standard bathtub would not fit into this space. It was 6 inches to short! At this point there were a few options.

a: Special order a new tub
b: Go with just installing a shower setup OR
c: Move the wall 6 inches

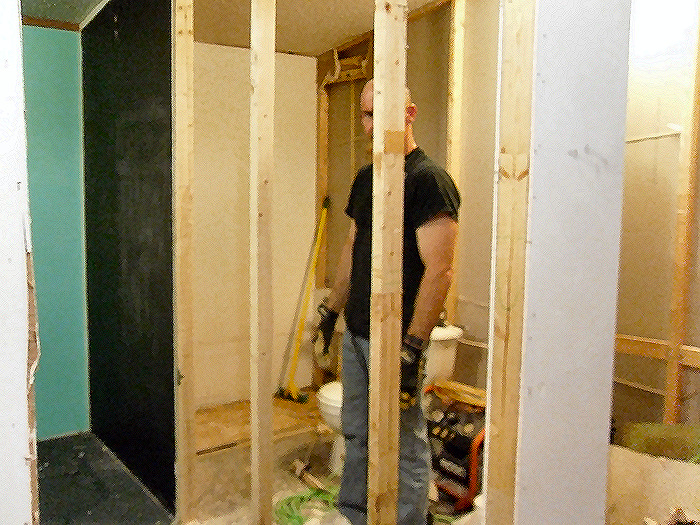
Did you guess which we chose?.....Yes, you guessed right, hubby tore down the sheet rock ...I think I need to feed him more.
Look, he can almost hide behind a 2x4!


Time to loosen the frame and move it over. 
Do you see the U.G.L.Y aqua something color in the next door room? 
The entire house had been painted in screaming, bright, and different kinds of greens ....

{IT WAS NASTY!!!}

That room is the last one in need of painting to get rid of some screwed up idea of a paint job. That's for another remodel project in the future tho.


The wall is moved over .....Yeahhhh!


Fast Forward >>>> Removed the old floor, moved the plumbing to the 
left hand side where the faucet for the tub will be. He also renewed the plumbing for the toilet and sink.

Next was a new sub floor and cement board. Then the bathtub was installed.

{ It's a perfect fit! }


To your left you see newly installed sheet rock and with that the wall is closed up again. What is not visible in this picture is a light coat of texture that has been sprayed on. Bead board is being installed on the ceiling. 
We went with the 10' boards instead of the shorter sheets. Plus we did not have to deal with any horizontal seams.


Here is the ceiling with all the boards installed and framed in by trim. The next step is to prime and paint


We tiled the walls around the bathtub with plain white tiles that I love, they give a clean nice look.


The floor has been tiled as well. Now the floor trim is almost all installed.


Thanx for having a looksee =)